
Don't forget our guide on Installing the RevLink Add-In
Export Floor Plan (Revit to CET)
The Export Floor Plan tool exports the floor plan that is currently active in Revit. Only 1 floor plan can be exported at a time. To use this tool, follow these steps:
- Click on the Export Floor Plan button. You will be asked to choose the floor to export as well as a 2D Floorplan or 3D View.
- Name the file and select which directory you want the floor plan to be saved in. Click Save.
- You will find the floor plan in the selected directory with file extension *.cmrfp.
Tips on exporting the 3D View, 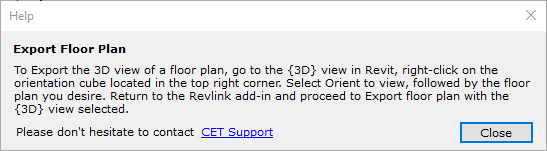
Import Furniture Layout (CET to Revit)
The Import Furniture Layout tool converts and imports the furniture layout created with CET into Revit. To use this tool, follow these steps:
- Click on the Import Furniture Layout button. You will be asked to select the CET Furniture Layout (*.cmrfl) that you want to import.
- RevLink then prompts you to select the Revit project and floor plan you want to import to. The Revit project and floor plan will automatically be selected for you if it is detected. However, you will still need to verify the information.
- The RevLink add-in converts the *.cmrfl files to Revit format and loads the drawing into your selected Revit project and floor.
Once the objects have been imported into Revit, the Revit user can move, rotate and duplicate the objects. However, changes to the CET objects in Revit cannot be transferred back to CET.
Import Family Files
The Import Family Files tool converts the CET Family file into a Revit Family file and imports it. To use this tool, follow these steps:
- Click on the Import Family button. You will be asked to select the CET Family that you want to import.
- The RevLink add-in converts the *.cmrf file into the Revit family and loads the file into the active drawing opened in Revit.
- You will find your Revit families (*.rfa) in the same directory as your CET families.
Comments
0 comments
Please sign in to leave a comment.