
Where can I find the Developer Migration Guide? It's gone in MyConfigura wiki 😥
In case if you didn't know yet, we're in the process of removing wiki in MyConfigura, and that's where it houses all of the developer migration guides / older QA testing guides for a long while now. The new refreshed site to the developer migration guides are now here : Click Me
Now, on to the testing guide:
Welcome to the 14.0 QA Testing Guide, please check with your developer to make sure 14.0 Migration is successfully completed (if any) before testing.
This recording is from the main 14.0 QA Testing Guide webinar hosted on 23rd March 2023.
CET 14.0 Migration Workshop Additions
With the 4 weeks recurring migration workshop after the main CET 14.0 QA Testing webinar, QA support and DEV support would put our hands together to answer your queries on migration difficulties, as well as to provide latest updates if there's any. Take a look at our Migration workshop schedule!
Migration Workshop on 10 April 2023
Crash when exporting as 'Configura SIF' format in Reconfiguration Tool
Developers made a fix to a crash when exporting as 'Configura SIF' format from Reconfiguration Tool. This is due to missing references which caused some information loss, hence the crash. To ensure it works good for you, follow test instructions below:
- In Reconfiguration Tool, perform an 'Order export' of 'Configura SIF' format and ensure it does not crash. Verify that the SIF export is successful and the output is accurate.
- If your extension has unique information (manufacturer specific tags) used in the drawing. In BOM, perform 'Order export' of 'Configura SIF' and ensure these manufacturer specific tags with information are shown correctly in the exported SIF document. This is when you have the 'Use manufacturer specific export' checkbox ticked.
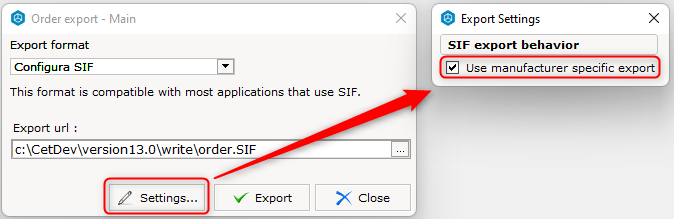
- To ensure a great experience in CET 14.0, ensure no unintended impact is caused when repeating order export in the Bill of Material (BOM).
Migration Workshop on 3 April 2023
Improvements working with Block, Filter, Categories
Update 16th May 2023: In view of the delayed CET 14.0 release, we've decided not to release this feature in CET 14.0 until further notice. The following section below related to "Improvements working with Block, Filter, Categories" can be skipped and no new behavior will be introduced.
In CET 14.0, working with the combination of Blocks, Filter and Categories have been improved. Hiding certain categories to snappers in blocks through the visibility settings in both model space and paperspace no longer hides the entire block, but instead only hide those that are assigned to the category. Previously with this limitation in place, blocks will need to be exploded as a workaround to filter each category. Take a look at the example below.
First off, there are 2 workstations in my drawing, on the left, it is already put in a 'Block'.
Off to paperspace, a viewclip is created with the sole objective to hide snappers categorized as 'Panels'.
In CET 13.5, filtering 'Panels' not only hides the assigned category, but the entire 'Block'.
In CET 14.0, filtering 'Panels' only hides the assigned category regardless of a 'Block' or not.
This fix involving Blocks, Categories and Filter aims to bring convenience around the flexibility to hide/show snappers flawlessly. Thus, follow test instructions below to ensure these areas don't introduce any 'Surprises' !
- By using your manufacturer extension, ensure these areas work as it should:
- Filtering of 'Blocks' in Model Space, verify that the correct (category/part tag) is hidden/shown.
- Filtering of 'Blocks' in Paperspace, verify that the correct (category/part tag) is hidden/shown in the Visibility settings of Viewports and Viewclips.
- With the desired filter applied, ensure the correct (category/part tag) is hidden/shown in the
- Generated PDF, Print Preview
- Exports *(Revlink, IFC, DWG, etc)
- Load drawing after it has been saved
- Rendering the filtered 'Block'.
- Creating a custom viewmode/viewset with filtered 'Blocks'.
These are just examples of CET Export methods that uses 'Filter'. This is highly dependent on your manufacturer usage/workflow. You may skip if your manufacturer workflow hardly uses any of the CET Export methods in the user's daily workflow.
Migration Workshop on 27 March 2023
Paperview Tag Color Legend
Developers made a fix to the method for '2D Conture Override'. Previously, if you happen to have *'Show only contour lines for 2D' option ticked in Control Panel, the tag legend in paperspace will be affected where the color of tag(s) will not be shown, as a result of being denied in the 2D Conture method.
Take a look of the comparison here in CET 14.0 against CET 13.5.
The workstations were part tagged 'Room1' in green color, however, with the contour option for 2D ticked, no colors would be shown in Tag legends before CET 14.0. Follow test instructions here:
- Using your manufacturer extension, apply part tagging(s). In paperview, by using your new/existing papers, place 'Tags Legend' under 'Tools (paper)' component tab. Ensure your part tag(s) colors in the 'Color' column are shown with accurate color representation.
- Test again with 'Show only contour lines for 2D' ticked and unticked. Both options should not affect the color representation in 'Tags Legend'.
You can find this option in 'Control Panel > Graphics > 'Show only contour lines for 2D'.
Paper Save Environment
The paper save environment has been upgraded to use 'RobustSaveEnv3' engine, expected to handle missing package discrepancies better.
Previously with the older engine, backward compatibility has been a recurring issue where some extension dependent snappers in paperspace will not refresh to proper model graphics even after the required extension has been installed. Copying paper sometimes are blocked, throwing package dependency errors. Follow test instructions here:
- Using your manufacturer extension paper(s) if your manufacturer extension comes with any, try loading any new/existing drawing with papers into CET. Ensure copying, creating new papers work as it should. Ensure in the viewclips and viewports, the snappers are shown accurately without any issues.
- Repeat with a new drawing with papers. When working with paper functionalities, it should not throw any unexpected errors shown in the photo above.
Main QA Testing Guide Webinar on 23 March 2023
cm.abstract.office
Developers made a fix to the abstract office as there used to be an issue with updating tiles on panels. Using your manufacturer extension, it's important to ensure tiles work as it should by following these smoke test instructions of:
- Place panels in drawing space, ensure creating/removing tiles are possible. The individual tiles/trim materials/features should be able to switch with ease in the quick properties. Ensure all these actions are reflected immediately in drawing space (2D/3D). Verify that tiles are updated with the most recent changes done.
- Copy and paste existing panel layout and ensure changes done to duplicated copy is reflected instantly too.
- Save and load drawing to ensure tiles are shown correctly with its features and materials set in the quick properties.
Paperspace improvements
Viewclip performance
Developers implemented a fix to the imageSnapper function, where it causes substantial performance concern when it is stretched/scaled followed by undo/redo operation. In contrast, this affects the viewclip rectangle when it is stretched/scaled when worked on, in 'Edit viewclip mode' to snip an area of the 2D drawing space in process to create a report in paperview.
Ensuring this does not introduce any new defects, follow these smoke test instructions.
- By using your manufacturer extension, create a simple drawing. Go to paperview, place a 2D viewclip on an empty paper. In edit viewclip mode, stretch the viewclip border back and forth, ensure it does not cause performance issues, does not feel slower than before.
- In the quick properties, try changing to different 'Scales', custom or free scale values. Make sure it does not lag in the process. When navigated back into paperspace, ensure snipped area is accurate.
Paper numbering order
On top of that, there is also a fix made to the order of when automatic manufacturer papers were generated. Currently, there are chances where the numbering order will not go in sequence if multiple papers are selected and duplicated.
If your manufacturer extension has auto papers, we strongly recommend to follow these testing instructions:
- By using your manufacturer extension, create automatic manufacturer papers. Check that the numbering order is correct.
- Then, select multiple papers in between, click on 'Copy selected paper', this step can be performed in the paper queue directly, or in paper manager. After the papers are copied, ensure that the numbering order is correct.
- Try dragging papers to sort, the numbering order should also be correct.
Scaled Image Fix
Undo image stretch creates duplicate and freezes original
Developers made a fix to an issue where stretching an image by any of its connectors, then undoing the stretch creates a duplicate image, on the other hand freezes the original image, making it inoperable with. It's crucial to test with your manufacturer paper templates which come with image placeholders (if any), do follow testing instructions to make sure this is fixed on your end.
Make sure this isn't 'bug'ging you now! 🪲
- In paperview, place an image placeholder from [Tools (paper) > Image > Image]. Stretch the image placeholder by its connectors. Undo stretch once, ensure the image is not duplicated and is resized to your stretched size. Test with your manufacturer template papers too, if you do have any.
- Repeat by placing an image placeholder in drawing space [Tools > Image and Text > Load Image], repeat test case above.
PDF Canvas and Pixel Device
The PDF export module has been improved where it became more precise in exporting as floating points are used when PDF is created each time. Losing its precision, the PDF could result in missing, unrecognizable lines hence losing details and also causing inaccurate scale to view clip, specifically evident in material handling drawings.
With this, a new PDFCanvas class was rewritten to pair with PDFDevice class making this possible. For more in depth technical details, refer to CET 14.0 Developer migration guide. Ensuring no change of behavior is introduced, follow these testing instructions:
- Perform a PDF export through:
- File > Import & Export > Export Drawing [pdf]
- Print Reports dialog > Create an Adobe PDF document
- Paperview tools > Export > Export to PDF
- Verify the exported PDF against your paper.
- Going a mile further, by using a preferred drawing, compare the PDF generation output by using *'PDF Diff' tool to really ensure no unintended changes are detected.
custom.reconfigs
In CET 14.0, developers fixed an issue where drawing parts are now retained correctly when its loaded into the *Reconfiguration tool. This ensures that the article view columns in reconfig can be sorted although it has been adjusted. Please follow smoke test instructions of:
- By using your manufacturer extension, load reconfig file into Reconfiguration Tool. Click on either 'Proposed' or 'Existing' block in the flow chart. Verify that the Part Number/Description/Comment columns can be sorted. Refer below for a brief example.
Note: The article view might already have sorting set before getting into reconfiguration tool. If that is the case uncheck these by opening View Settings>uncheck any applied sort settings.
Material Lab
New PBR Material Pack (MH)
We talked about targeting to release new PBR material packs that are industry specific. This means each industry will get their fair share of new materials to work on. This time around, we are rolling out the latest addition specifically just for the 'Material Handling' CET edition / industry. Ensure you have the license for this material pack, look it up on marketplace 😊.
Aside from the new thumbnails and material pack, we're making sure the rest still works for you with these smoke test instructions.
With your extension snappers, try:
- Changing to different materials in the quick properties or scheme manager, make sure they look correct as before, watch out in 2D/3D.
- Perform a rendering and ensure the materials still look as accurate.
- Save and Load new/existing drawings to make sure no unintended visual changes happen.
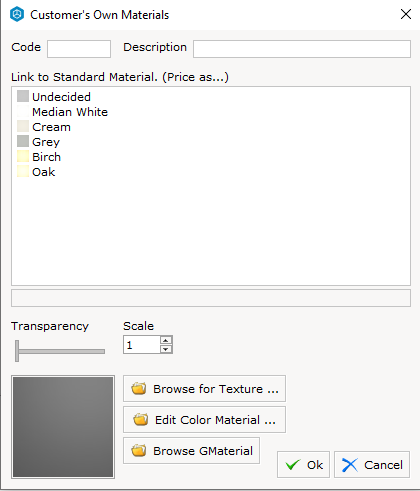
- Create 'Customer Own Materials'(COM) and ensure they still work, refer to photo below.
Floating-point Rounding Behavior
This is not something introduced in CET 14.0, but it comes from Windows 10 version 2004 (build 19041) released back in May 2020. This affects floating numbers with precision 1 ending in '5' will always be rounded up. However, there's more to the technical details behind it, for more information, visit CET 14.0 Developer migration guide for a detailed explanation. Though this is not new, but it's important to make sure floating point numbers still work as usual, hence follow smoke test instructions of:
- Using your manufacturer extension, ensure the floating point numbers is precise for the snapper's dimensions. For assurance, check the dimension values in the properties of the snapper against the product specifications.
- By stretching the snapper's length, width, height, ensure in the animation properties, the real-time update of numbers is accurate.
- Ensure the product's dimensions are accurate in both elevation view and elevation view document, if your manufacturer extension has customised manufacturer papers.
- Also, check the pricing of snappers in the Bill of Material to ensure that there are no differences.
Abstract Material Handling
In CET 14.0, developers made numerous changes for code maintenance to the engine and behavior in the Material Handling abstract. Code maintenance include addition, renaming of different classes which does not introduce new functionalities for the end user, but it's important it does not cause adverse behavior.
If you come from Material Handling industry, we recommend you to follow this section, otherwise you may skip. Using your 'Material Handling' manufacturer extension, follow test instructions of:
- By using 'Racking Configurator', ensure the 'Flue Gap' for row is configurable and works good. Try updating the different properties (Thickness, Distance, Offset) if your manufacturer extension allows it.
- Check if Unit Load editor works for you. Try adding a customised unit load and ensure it can be applied. (if your manufacturer extension has one)
- Ensure all of the configurators (Racking, Unit Load , Bay, Frame) presets can be saved and loaded.
- Ensure you are able to insert different row layouts (Single End, Double End, Deep, Double Deep etc) of pallet racking.
- Verify that you are able to stretch all racking / conveyor points (Width, Height, Depth). Ensure that the pallet racking populates correctly and the changes are reflected immediately. If your manufacturer extension has collision feature implemented, ensure it works when there are obstacles or a snapper that gets in the way.
- Modify the properties within the pallet racking. Ensure the 'Spread' function works by picking up the modified properties then spreading across by all methods (Single, Bay, Row, Column, System, etc).
- Check if accessories such as *(Flank protector, Corner protector, Upright protector) can be snapped onto the frames accordingly.
- Check if the load can be put on floor (If your manufacturer extension has this option).
Naming of accessories may vary depending on your manufacturer extension.
New features
Catalogue Downloader
In CET 14.0, we've revamped the catalogue downloader UI, which now comes with a brand new refreshed dialogue to improve its scalability. However, this has not made as the default catalogue downloader just yet as we're transitioning things slowly to mitigate as much risks as possible. To use, there will be a new section 'Catalogues' in Control Panel, where you will see a new toggle to switch to the new catalogue downloader.
When toggled 'on', a new icon will appear in windows taskbar. However, a restart of CET is recommended for a complete switch to the new catalogue downloader.
*If not found, click on '^' arrow to expand system tray
When opened, here's the new catalogue downloader in all its glory!
Referring to the animation above, the all new user interface now has:
- Completely segregates between on going and completed downloads.
- Sidebar summary that shows [Catalogue downloads remaining, *Download speed, *Catalogues Failed]
- Ability to pause downloads.
- Switch catalogue download priority.
With that, it's utmost important to ensure that your manufacturer extension integrates well with this awesome new feature we have on the table.
Please follow smoke test instructions of:
- Using your manufacturer extension, *simulate catalogue downloads, ensure your catalogues can be successfully downloaded using the new Catalogue downloader. Ensure the *download speed of the new Catalogue downloader matches the network speed that is displayed, and is not slower when compared to the old Catalogue downloader.
- Make sure the catalogue download priority switch works on your manufacturer extension and the downloads can be paused when intended to.
- When the catalogue downloads are completed, ensure the model and graphics are accurate when the catalogue snapper is placed in the drawing space. Ensure the animation or quick properties works for materials and other features, stretching should work flawlessly too.
- If the catalogue snapper is placed in drawing space before the download is completed, or even during, it will be shown as an 'unknown box' in your component tab and in drawing space. After the download has completed, ensure it refreshes both the component tab and the snapper to the full-fledged product icon and model graphics.
- Download speed varies from user to user depending on your IT infrastructure and network provider.
- Catalogue failed gives first-hand notice on the number of failed downloads for your attention.
- Simulate catalogue download by simply deleting the catalogue folder in the download location / adding new catalogue extensions.
Project Information
For ease of quick updates to your project information, 'Top Notes' and 'Shipping Notes' can now be updated on the go in variable selection dialogue for 'Data field', without needing to open the actual 'Project Info' dialogue again in drawing space.
Be noted that this may not affect some manufacturers, as they have their very own specific 'Project Info' fields. However, this can come in handy for manufacturer extensions which solely uses the core 'Project Info'.
Take a look at the difference of the variable selection dialogue below between CET 13.5 and CET 14.0.
When double clicked, on a dynamic 'Data field' variable, it opens up a variable selection dialogue below:
CET 13.5 - By clicking on both Top Note and Shipping Note, it does not allow quick updates.
CET 14.0 - By clicking on both Top Note and Shipping Note, it allow quick updates in case user changes his/her mind.
If your manufacturer extension has specific 'Project Info' fields, you may skip this otherwise:
- In drawing space/paperview, place 'Data field' snapper in empty space. Double clicking it opens up variable selection dialogue. By expanding hierarchy to 'Project variables > Project Info > Order Notes > Top Notes / Shipping Note', fill in some of the fields and ensure it can be registered when variable selection dialogue is closed.
- When generating print preview or PDF report, the registered values should reflect.
- Save and load drawing should retain the registered values.
New Dialogue for Revit Layout Export
Revit Layout Export has always been one off, where filtering before an export was never an option. We've made improvements to the 'Export Layout to Revit' function, where it now opens up a dialogue for different preferences. On top of being able to filter, there are options now to export in a different level of detail, snapped objects as a group or even textures from CET.
Level of Detail (LOD) in CET comprises of 4 levels [Low, Medium, High, Super]. Below is an example of an exported Revit object in low and super LOD. (From left to right)
If Export snapped objects as a group is ticked, the group symbols will be treated as a group where it will highlighted in Revit.
There is an option now whether to export textures from CET, looking at the example below, if enabled, the textures from CET will directly apply on the exported Revit copy. Below is an example of CET catalogue snappers with (Top) and without (Bottom) CET textures.
'Export architectural objects from CET to Revit' feature has been moved from 'General' settings to 'Family settings'. General export for architecutral objects like (Walls, windows, etc) can now be controlled in Filter instead, so this feature has been moved, making it applicable only for family files.
To try this feature out in your CET 14.0, follow test instructions below:
- Using your manufacturer extension, make a simple drawing. In 'Revlink' extension toolbox, click on the 'Export Layout to Revit' button. In the Export Revit layout dialogue, try applying the filter to hide some parts of your drawing. When imported into Revit, the hidden parts should not be shown.
- Try exporting your drawing in multiple LOD levels, the numbers of triangle should reduce/increase depending the level selected. Verify the rendered accuracy of your snapper in Revit, ensure it is not affected.
- Exporting your drawing with 'Export texture from CET' feature inherits the texture from CET, should be visible and accurate when exported layout is imported into Revit.
- Exporting a Revlink with 'Export snapped objects as a group' should work where the snapped parts should be treated as a single object, shown highlighted when imported into Revit.
IFC Select for Move
In CET 14.0, the IFC module now has a new feature where it allows the entire imported IFC snapper to be relocated in CET with ease. There are often circumstances where, designers has to match the coordinates of the imported IFC floorplan against CET snappers, which were worked on earlier before the availability of a floorplan. Relocating the CET snappers 1 by 1 to match the floorplan coordinates would be inconvenient and may lose some precision in the process.
Hence, this feature allows the entire IFC floorplan/layout to be relocated with ease. In the 'IFC interface' extension toolbox, there is now a new button 'Select IFC for Move' which can be clicked on, to move the imported IFC object.
Below animation shows a quick demonstration where the entire IFC floorplan was moved to match the CET gardening snappers.
There are no test instructions for this new feature because it is very workflow based depending on the user.
Material Handling Categories
Material Handling manufacturers that are based on the latest abstract will now be allowed to select sub-categories for different components in the Category dialogue. This promotes the flexibility of manual assignment of sub-categories which can be used for visibility preferences.
By using your material handling manufacturer extension, follow test instructions of:
- Open the 'Category' dialogue from 'Tools' menu. Ensure the category for 'Material Handling Storage' can be expanded. Once expanded, sub categories comprises of *different components. Ensure it can be clicked on to assign 'tick' and 'un-tick'. Verify that the selected count works and respond to changes.
- Save and Load drawing, ensure the ticked/un-ticked sub-categories are remembered.
Depending on your manufacturer extension, naming of components might vary, there might also be extra/lesser components.
Performance Testing
Performance is a very important aspect that drives CET's usability experience. As we strive to provide more enhancements and new features in the later CET versions, performance is taken into strict consideration to ensure its consistency and does not introduce an unintended ripple effect throughout. With that said, we would like our manufacturers to run some basic performance tests, to make sure they are not affected.
Basic checklists
- To ensure the best performance possible, please switch off unused extensions, which will contribute to faster CET loading and startup.
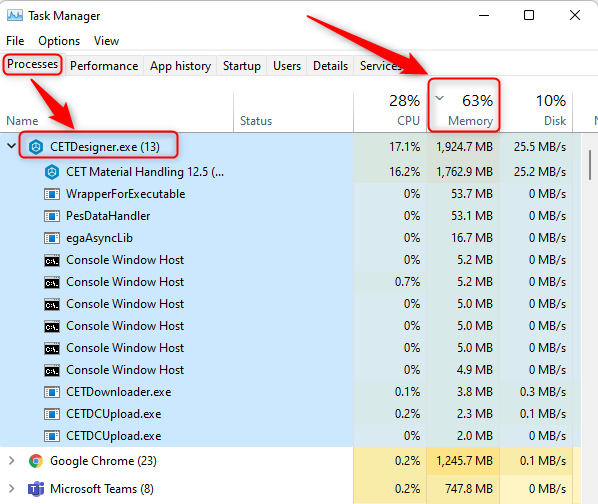
- Test for possible memory leak issue using Window's Task Manager (Open using shortcut CTRL + SHIFT + ESC). Look for 'CETDesigner.exe' under 'Processes' tab and make sure overall memory consumption is not maxed out, with CET eating up most of it. Check that CET's memory consumption makes negligible difference between old and new, report if you experience abnormally high memory consumption by 'CETDesigner.exe'.
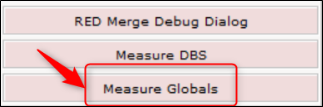
New Tool in Release Debug
Measure Globals
A new tool to inspect memory allocation for packages installed in CET. This tool can be used to determine memory leak of certain packages if memory is growing overtime and not being release.
What you can do:
- To be used whenever there is a memory spike or memory maxing out in Windows Task Manager. Or unusual sluggishness or slowdown were felt while using CET.
- Open up Release Debug menu using Ctrl+Alt+Shift+F12. Click on "Measure Globals". Some users might have clashes with Intel HD Graphics shortcut.
- The traces will be written to CET log file. Send the log file together with relevant information to devsupport@configura.com for investigation.
Response Monitor tests
We highly recommend using 'Response Monitor' under 'QA Tools' to trace the time taken for different actions done in CET. Compare the time taken for the same actions done between the old and new versions of CET. If time taken difference is of a huge margin, you may report to 'devsupport@configura.com' for assistance.
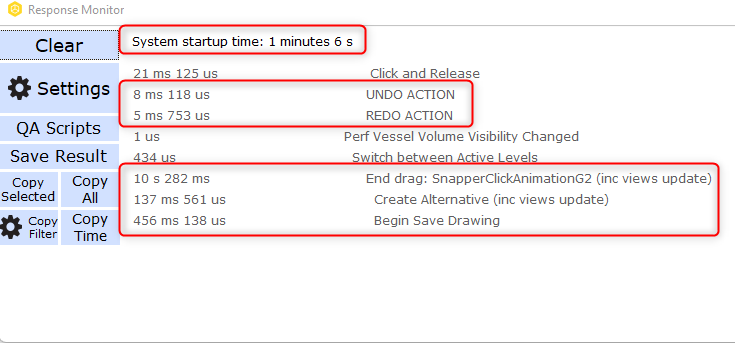
By using your manufacturer extension, we suggest checking time differences for these actions:
- System startup time
- First snapper placement, and subsequent continuous placement
- Stretching (check if its smooth and not jerky)
- Copy and Paste
- Creating Alternatives
- Save and Load drawing
- Material application in [Animation, Quick Properties, Customer Own Material, Scheme Dialog]
You can check your manufacturer extension startup time by using QA Tools > Startup Time.
That's all we have for you!
The QA Support team would like to wish you all the best in your 14.0 Migration journey. 👍
Have additional questions?
Links that may come handy to you
Release and Migration Best Practices
As always, reach out to us at qasupport@configura.com if you have questions
Comments
0 comments
Please sign in to leave a comment.