
Each tab represents a type of element the product can reference. Some are external files, and some are other project elements. References to the elements can be created by dragging them from the list to the product in the Product View. Additionally, if the user has products visible in the Navigator, elements may be dragged to products there as well. Except for the Preview Images tab, the list allows the user to select multiple elements by either holding the Ctrl or Shift keys while selecting elements.
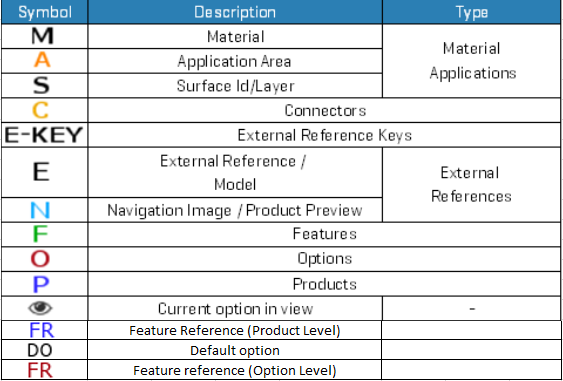
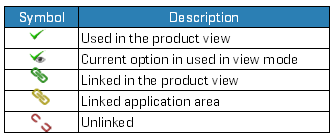
Symbols used in the Product View and Navigator.
Symbols used in the Reference tabs.
Additional Products
This tab lists all products that currently exist on the project. It reflects the same list of products created in the Product tab and these products can be referenced in other products as additional products.
To add an additional product reference, drag and drop the product from the list to the product in the product view window. It can be referenced as it is in a product or can be added to an option. To add an additional product to the option, users may drag and drop it to the desired option instead.
Besides, users may also add the additional product through the Features tab. More information on additional products may be found on the Additional Product page.
Do note that additional products can only be referenced to other products but not itself. A stop sign will be shown when the additional product reference is not valid/allowed during the drag-and-drop action.
The icons next to the product list indicate whether or not they are referenced by the current product. A red cross indicates that the product is not referenced. A green check means that the product is referenced.
Search through the product list with the AND or OR operators, and filter by Product Name Must Contain and Product Name Must Not Contain.
Features
This tab lists the features that currently exist on the project. It reflects the same list of features as created via the Features tab. Features can be referenced by either products or options.
To add a feature reference, drag the feature from this list to the product or an option in the Product View.
It is important to note a slight difference between feature references and other references, such as external references or material applications. In most cases, the element that appears in the Product View is a special reference type, so editing that element is editing the reference. In the case of features, however, the elements that appear in the Product View represent the actual features. This means that changes made to a feature in the Product View will be mirrored to all other products and options that refer to that feature.
More information about features may be found on the Features page.
Search through the features library defined in the Features card with the AND or OR operators and filter by Feature Code Must Contain, Feature Code Must Not Contain, Feature Description Must Contain, and Feature Description Must Not Contain.
Materials
This tab lists the materials that currently exist on the project. It reflects the same list of materials created in the Materials tab.
These materials can be referenced in several ways. Material may be referenced directly by a material application or indirectly by an application area. The creation and manipulation of application areas are covered in the Application Areas and Edit Application Area sections. Material applications can exist on products, features, or options.
To create a material application from a material, drag the material(s) to the desired location. To change the material reference on an existing material application, drag a material to that material application, and the reference will be changed. The icons next to the materials indicate whether or not they are referenced by the product. A red cross indicates that the material is not referenced. A green check means that the material is referenced.
Currently, there is no special icon to indicate that a material is referenced via an application area. More information on materials may be found on the Materials page. Search through the material library defined in the Materials card with the AND or OR operators, and filter by Material Code Must Contain, Material Code Must Not Contain, Material Description Must Contain, and Material Description Must Not Contain.
Models
This tab lists models in the project’s Symbol Directory and its subdirectories. To view the contents of a subdirectory, double-click its entry in the list. To return to a parent directory, double-click the item with the image of a folder with an up-turning arrow. The current directory (relative to the Symbol Directory) is displayed above the list. Note that the creator currently cannot detect when the contents of a directory have changed. If the contents of a directory have changed while it is visible in the Models list, press the Refresh button to re-examine the contents of the directory.
When a model is referenced by a product or option, it is done via an element called an external reference. Placing a model from the Models tab list will create an external reference on the product or option. Once placed, the external reference can be edited to modify how the model appears on the symbol. To edit an external reference, double-click it in the product view. More information on editing external references can be found in the Edit External References section. Search through the Symbol Directory files with the AND or OR operators and filter by Filename Must Contain, Filename Must Not Contain, and Model Contains Layer. The Model Contains Layer filter allows symbols to be found via a fully matched layer name.
The icons next to the models indicate whether or not the model has been referenced by the product. If a model has not been referenced, it will appear with a red cross. If a model has been referenced, it will appear with a green check.
Layers
This tab lists layers provided by the models currently referenced by the product. As models are added and removed, this list will change to reflect the altered set of provided layers. Layers are how a symbol applies materials and can be referenced in several ways.
A layer can be referenced directly by a material application or indirectly by an application area. The creation and manipulation of application areas are covered in the Application Areas and Edit Application Area sections.
Material applications can exist on products, features, or options. To create a material application from a layer, drag the layer(s) to the desired location. A new material application will be created from the layer selection. To append layers to an existing material application, drag the layer(s) to the desired material application, and the layers will be added. Search through the linked symbol layers with the AND or OR operators to filter by Layer Must Contain or Layer Must Not Contain.
The icons next to layers indicate how the layers are referenced by the product. A red, broken link indicates that the layer is not referenced in any way.
A yellow link indicates that the layer is referenced indirectly by an application area. A green link indicates that the layer is referenced directly, either by a material application or an application area referenced directly by a material application.
Parameters
This tab lists all the parameters available in the models currently referenced by the product. The parameters are defined in the model lab at the stretch section. As models are added and removed, this list will change to reflect the altered set of available parameters.
The parameter can be referenced in connector, features, additional product and/or graphic. To add the reference, the user may drag and drop the reference to the desired connector, features, additional product and/or graphic respectively. The details of each reference are discussed in the Parametric Model Stretch section.
The icons next to layers indicate how the layers are referenced by the product. A red, broken link indicates that the layer is not referenced in any way. A yellow link indicates that the layer is referenced to a connector. A green link indicates that the layer is referenced to feature.
Search through the linked symbol layers with the AND or OR operators to filter by Measure Code Must Contain or Measure Code Must Not Contain.
Preview Images
This tab lists preview images in the project’s Previews Directory and its subdirectories. To view the contents of a subdirectory, double-click its entry in the list. To return to a parent directory, double-click the item with the image of a folder with an up-turning arrow. The current directory (relative to the Previews Directory) is displayed above the list.
Note that the creator currently cannot detect when the contents of a directory have changed. If the contents of a directory have changed while it is visible in the Preview Images list, press the Refresh button to cause the list to re-examine the contents of the directory.
When a preview image is referenced by a product or option, it is done via an element called an external reference. Placing a preview image from the Preview Images tab list will create an external reference on the product or option. Once placed, the external reference can be edited to modify the image being referenced. To edit an external reference, double-click it in the product view.
More information on editing external references can be found in the Edit External References section of the Edit Geometry article.
Search through the features library defined in the Features card with the AND or OR operators and filter by Filename Must Contain and Filename Must Not Contain.
The icons appearing next to the preview images indicate whether or not the preview image has been referenced by the product. If a preview image has not been referenced, it will appear with a red cross. If a preview image has been referenced, it will appear with a green check.
Application Areas
This tab lists the application areas currently on the project. Existing application areas can be edited by double-clicking on them in this list. New application areas can be created by pressing the Create Application Area button in the toolbox.
Editing application areas are covered in the Edit Application Area section, and general information about application areas can be found on the Application Areas page.
Typically, application areas are referenced implicitly by layers on the models referenced by the product. However, application areas can also be referenced explicitly by placing them on a material application. This also allows the product to alter a material that may be referenced by an application area.
To create a material application from an application area, drag the application area(s) to the desired location. A new material application will be created from the material. To add an application area to an existing material application, drag the application area to the desired material application, and it will be added.
Search through the Application Area library with the AND or OR operators and filter by Application Area Code Must Contain, Application Area Code Must Not Contain, Application Area Layer Must Contain, Application Area Layer Must Not Contain, Application Area Material Code Must Contain, and Application Area Material Code Must Not Contain.
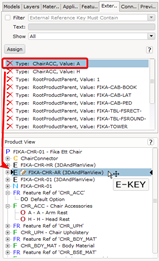
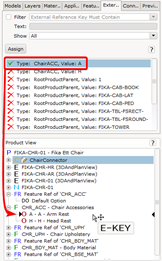
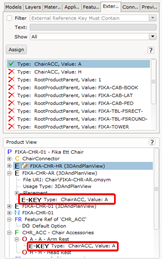
External Reference Keys
This tab is used to assign external reference keys to external references or options. The external reference keys allow multi graphics in option by matching the keys to the designated symbols and options. This is especially useful for products that share the same feature but do not share the same graphics.
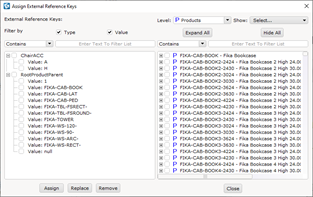
To edit an existing external reference key, double-click its entry in the list. The Edit External Reference Key area will update to allow editing. To add an external reference key, drag the external reference key to an external reference or option in the Product View.
The icons next to the external reference keys indicate whether or not they are referenced by the product. A red cross indicates that the external reference key is not referenced. A green check indicates that the external reference key is referenced.
Search through the features library defined in the Features card with the AND or OR operators and filter by External Reference Key Code Must Contain, External Reference Key Code Must Not Contain, External Reference Key Description Must Contain, and External Reference Key Description Must Not Contain.
Press Assign to assign external reference keys to multiple products, External References, or options.
Connectors
This tab lists all the connectors currently on the project. Existing connectors can be edited by double-clicking on them in this list. Editing connectors are covered in the Edit Connector section.
New connectors can be created by pressing the Create New Connector button in the toolbox or dragging the connector(s) to the product. To update the reference on an existing connector reference, drag a connector to the reference. To edit a connector reference, double-click it in the Product View. Editing connector references are covered in the Edit Connector Reference section.
More information on connectors may be found on the Connectors page.
Search through the features library defined in the Features card with the AND or OR operators and filter by Connector Code Must Contain, Connector Code Must Not Contain, Connector Description Must Contain, and Connector Description Must Not Contain.
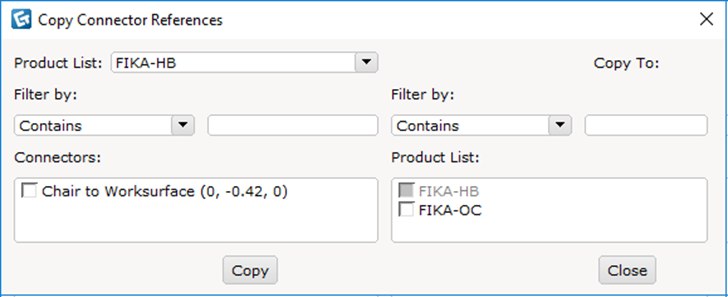
Click Copy Connectors to copy multiple connectors of a selected product to multiple other products using Ctrl + A or Shift + left click to select.
Misc Files
This tab is used to add any supporting documents or files to your Products or Options. Those files could be PDFs, Word/Excel/PowerPoint documents, and even images.
To add a Misc file, store them in the Project File you had specified earlier in the Resource Directories. The Misc File tab will automatically refresh and list down the files stored
Drag and drop the desired Misc File to the Product View card below it into your Product (P) or Option (O). Once in your Project View card, it will be marked with the symbol E for External Reference followed by the file name and a suffix (OtherType). Click on the file to edit its details in the Edit External Reference card on the right.
Notes
This tab is used to add a Custom Text or a Note to your Products, such as a technical description, product text, package dimensions, Http-links etc.
Click Create Note to get started and double-click New Note. Fill in your desired details in the Edit Note card on the right.
Simply drag and drop your Note into the Product View card in your Product (P Symbol) or Option (O Symbol).
The added Note will be marked with an N symbol and followed by the Code, Key, and Title of the Note.
Comments
0 comments
Please sign in to leave a comment.