
The Model Previews section is used to generate preview images for products in the current project. Previews may be generated for single products or all products at once.
Save To
To specify the save location for preview images. By default, it saves to the location set in the Previews Directory under the Resource Directories section.
Users can change the location manually as well by using the (Browse…) button on the right.
Note that previews outside of the Previews Directory will be unreachable unless the Search External Directory in the Automatically Assign Resources section is checked under Others in the Utilities tab.
Quality
A drop-down list with three options, Thumbnail, Sketchy’ Thumbnail, and Photo Quality
- Thumbnail
The default quality and shortest time to generate preview images.
- Sketchy’ Thumbnail
Same quality as the Thumbnail, but with sketched effect. The scale let users decide on the level of sketched effect of the preview images. A value of 1 will look the “sketchiest”.
- Photo
The highest quality, but also the longest time to generate preview images.
It is possible to have mixed quality of preview images. Users may make use of the filter function, as below, to batch generate on a certain quality, then repeat the steps for different previews’ quality with a different filter condition.
Filter by
- Product code / Part number & Product Description check box
Allow users to decide on the look-up area. It can be either, both, or none
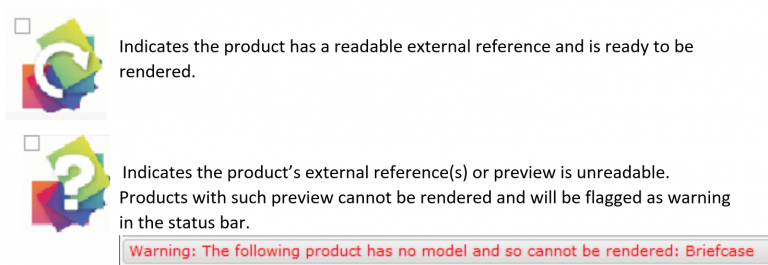
- Drop-down list of No/Unmatched/Invalid Preview
To filter out the product with no preview images, no assigned preview images, and unreadable preview images respectively.
It is useful to narrow down preview images that require reworking.
- Must Contain / Must Not Contain & the blank.
Must Contain will filter by matching the inputted keyword in the blank and vice versa.
- Product drop-down list
It will list all available products in the project and will update instantly based on the above selection/inputted keyword.
Render
- Render
To render preview images for selected products.
- Render All Models
To render preview images for all products with an available external reference.
- Abort Rendering
To immediately stop the ongoing render process.
Besides, users may double-click on the specific model preview to perform a quick render with the selected Quality.
The image previews window
Shows the products based on the Filter by. Users may hover over the product to show the tooltip completed with the selected options information if features are available in the product.
Right-click on the available preview images will show users the
- Properties
Properties dialogue of the product, exactly as it is when placed in the drawing. Users may change the options choices here to decide on what or what not to show in the preview images. The tooltip mentioned above will update instantly after the changes. Do note that these changes will not alter the option chosen in the main product. It is solely for preview image rendering purposes.
If this is not showing up, indicates there is no feature in the product.
- Geometry
To navigate users to the product in the Geometry tab
- Delete preview
To delete the matched preview images. If this is not showing up, indicates there is no preview image matched to the product.
The model previews window (top right)
Shows the model previews according to the tooltip.
Users are allowed to decide the product renders angle either by positioning using the navigator arrows right underneath it or right-click on the preview window to drag and rotate the product. The lock icon allows users to lock and fix the preview angle at the desired viewpoint for the products only. Users will need to unlock it to alter the view and repeat the steps for view lock.
The Unlock all button underneath allows users to unlock all locked previews.
Check option (bottom right)
- Check all
Check all previews shown in the image preview window.
- Check selected
Check only the selected/highlighted previews in the image preview window. To select multiple previews, users may use either
-
- CTRL+left-click
- Shift+left-click
- Manually left-click to check the preview box
- Navigate the previews with arrow keys, and use the space bar key to check/uncheck the box
- Clear Checked
Clear every checked preview in the image preview window
To render all previews with the same orientation
- Right-click to change the option in the properties if needed.
- Click on any product preview. Decide the preview’s angle in the model previews window. A default angle will be used if this step is skipped.
- Click on Render All Models to generate all preview images with the viewpoint set in step 2.
- Every preview check box will be checked, indicating the renders job queue and will be unchecked when the product’s rendering is done.
To render certain products with a different view
- Go to the specific product(s), adjust the view to the desired angle, and click on the lock icon to fix the viewpoint.
- Select the altered preview’s products with the check option function and click on the Render button to re-generate only the selected previews.
To render all previews with both non-locked and locked view
- Select/change the option to use for preview images if needed.
- Adjust the view for the non-locked view product or skipped this step to go with the default angle.
- Go to the specific product(s), adjust the view to the desired angle, and click on the lock icon to fix the viewpoint.
- Users will need to first click/select one of the non-locked-view products, only then click on the Render All Models button to generate all previews in a single process. If the user missed selecting a non-locked view product before rendering, the non-locked-view products will result in the last selected locked-view preview angle.
Comments
0 comments
Please sign in to leave a comment.